Quickstart
Installation
Requirements:
- Python 2.7
- Python packages
numpy,scipy,pandas,h5py,matplotlib,seaborn - IMP (Integrative Modeling Package.)
Conda package is recommended to install all the requirements. Either Anaconda or the minimal Miniconda are suitable for managing required packages including IMP. If you use Miniconda, then you can install as follows:
$ conda install numpy scipy pandas h5py matplotlib seaborn
Install IMP using conda:
$ conda config --add channels salilab
$ conda install imp
All other dependencies for imp and python packages will be automatically installed.
Then install PGS workflow packages:
$ python setup.py install
To test if the installation goes well, the following command can be executed:
$ cd test
$ ./runPgs_workflow_test.sh
PGS Helper GUI
PGS package includes a Graphical User Interface (GUI) based helper program for user to run PGS easily.
With this, a user can generate a command script runPgs.sh and a configuration file input_config.json.
Tip
PGS Helper uses Java Runtime Envrionment, the latest Java SE 8 update is recommended.
Note
PGS Helper is a convenient interface but not required to run PGS. We also provide the runPgs.sh and input_config.json examples that are easy to modify (PGS Helper Output) without using the GUI.
Using the PGS Helper
To initialize PGS Helper:
$ java -jar PGSHelper.jar
The following GUI will appear:
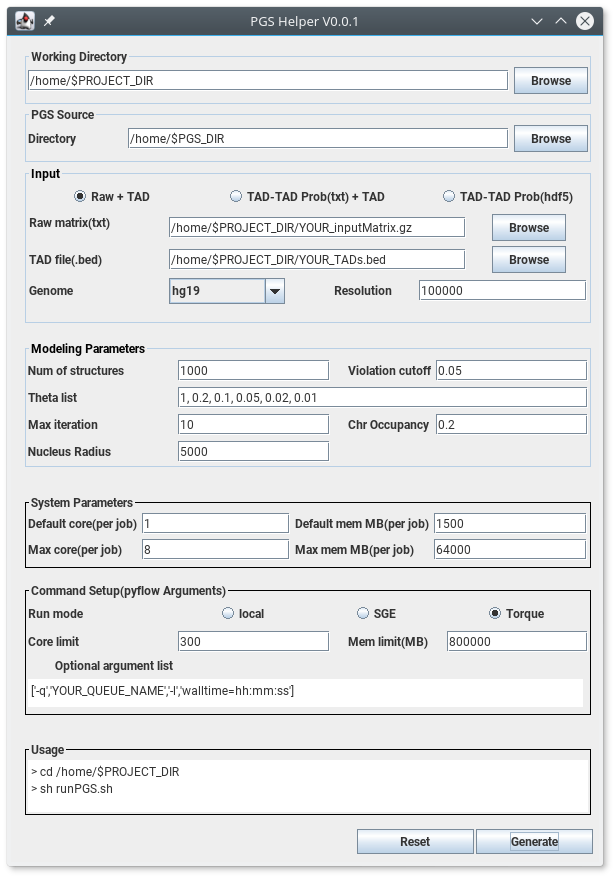
A. Working Directory
Specify the project/working directory using the Browse button on right side. PGS will run in the specified project directory and all files,
such as running script(i.e. runPGS.sh), configuration file(i.e. input_config.json), log(i.e. pyflow.data), and output results,
will be stored in the directory.
B. PGS Source – Directory
Specify the directory of PGS source code using the Browse button on right side.
C. Input
Note
Currently our pipeline only support diploid genome, so chromosome Y is not supported and please don’t include it in the input file. We will be updating the support for chromosome Y soon.
Experiment data
Option 1 : Raw + TAD
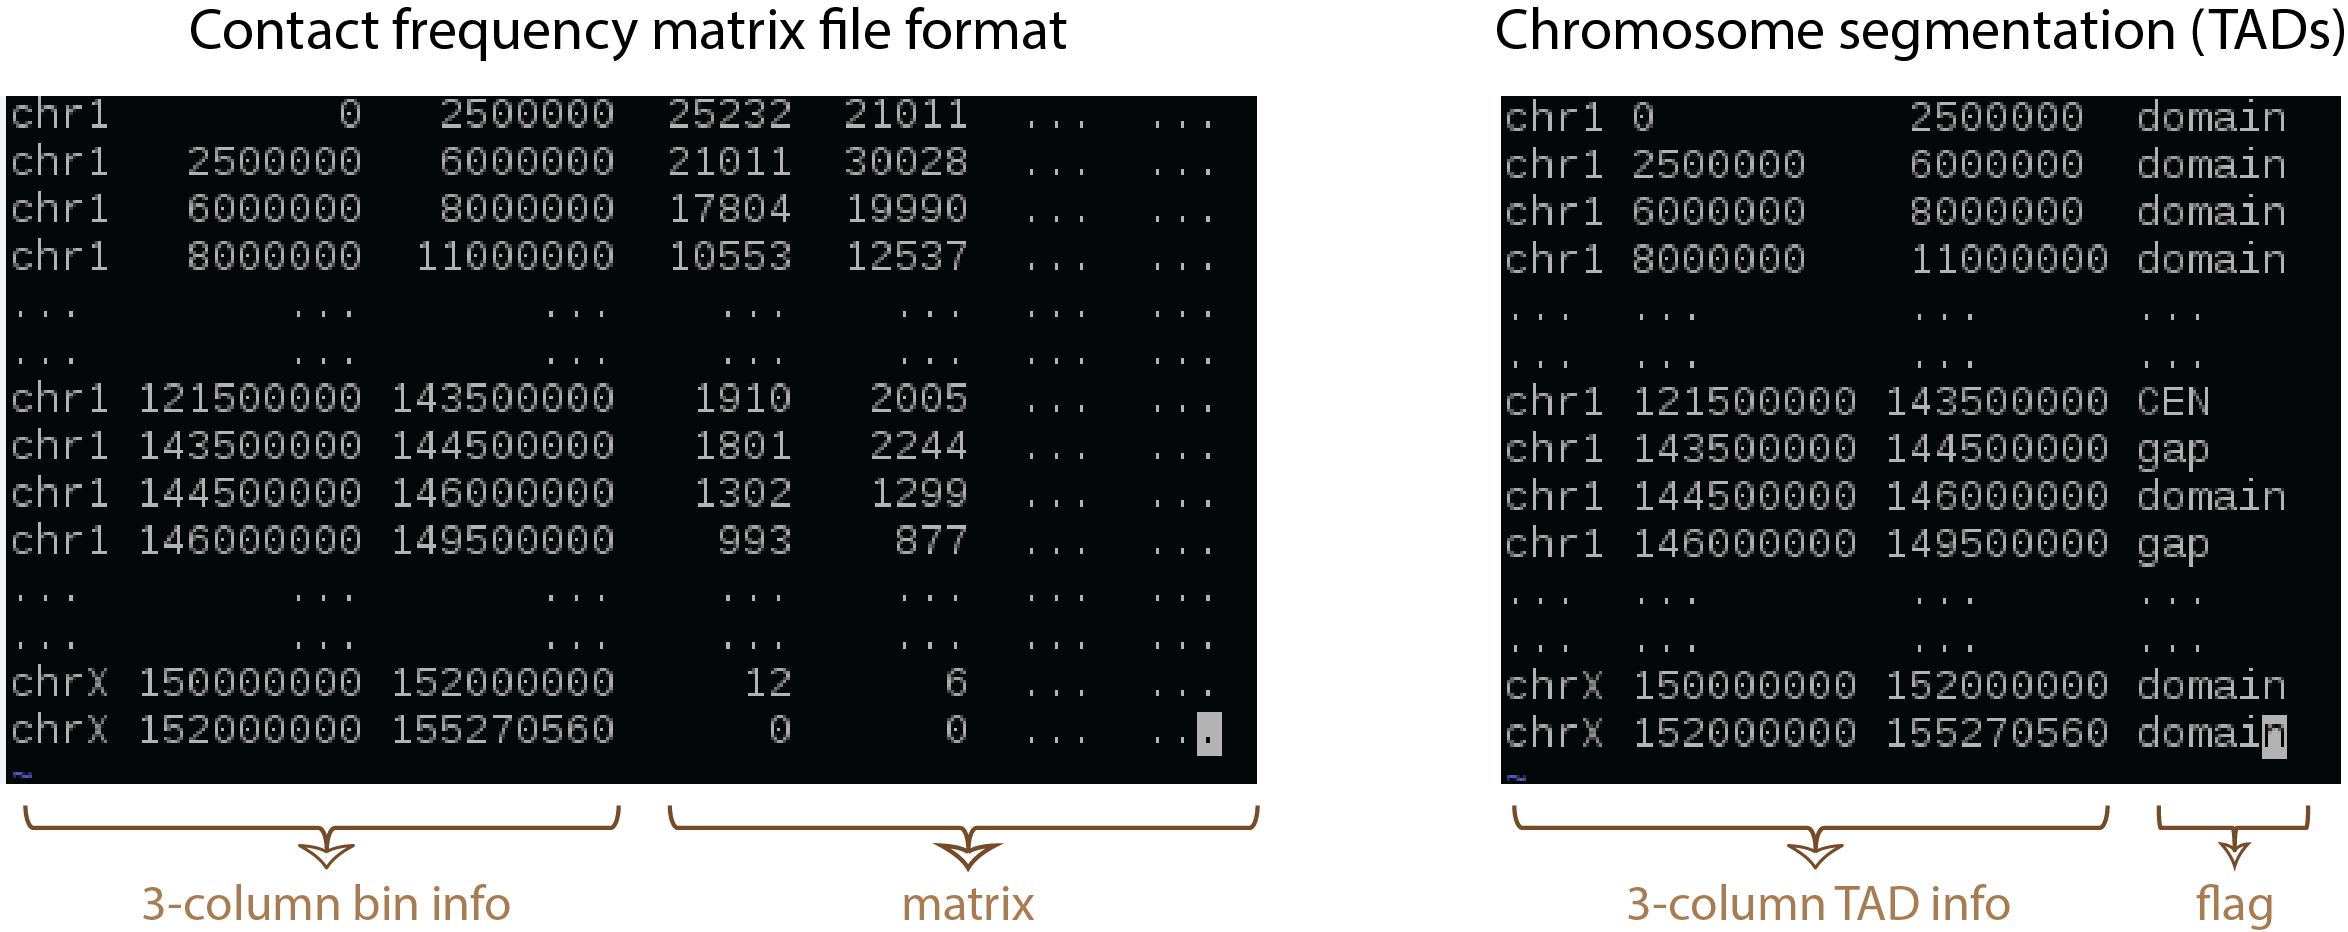
- Raw contact matrix file (txt); the first three columns contain chromosome, start position (bp), and end position (bp) and followed by contact matrix (all numeric values must be integers; see figure above).
- Important: Raw dense matrix is inefficient for HiC data sharing, we support *.hic and *.cool format. For file format convertion check Frequently Asked Questions if you encounter any problems for file convertion.
- TAD_file (bed); a 4-column chromatin segmentation or TAD file, we adopt bed file format while the 4-th column must contain “domain”, “CEN”, and “gap” (see figure above).
Option 2 : TAD-TAD Prob(txt) + TAD
- Probability matrix file (txt); adopts the same format as the raw contact matrix file above, but the matrix contains probability values from 0 to 1.
- TAD_file (bed); the format as figure above.
Option 3 : TAD-TAD Prob(hdf5)
- Probability matrix file (hdf5) : if a user have generated probability matrix using PGS (i.e. under old
$PROJECT_DIR/result/probMat/probMat.hdf5.hmat), then the user can use the previous probability matrix. This process will skip the first workflow, buildTADMap task. This option is good for replica calculations (in a new working directory, of course).
Genome : the genome version of 3D models being constructed (current PGS supports chromosomes 1-22 and X).
Resolution : the resolution of raw input data (in bp).
D. Modeling Parameters
- Num of structures : the number of structures to generate.
default = 1,000 - Violation cutoff : violation cutoff.
default = 0.05 - Theta list : a probability list for step-wise optimizations; 1 < theta < 0.
default = 1, 0.2, 0.1, 0.05, 0.02, 0.01 - Max iteration : the number of maximum iterations for each theta.
default = 10 - Chromosome Occupancy : the expected ratio of chromosome volume in the nucleus.
default = 0.2 - Nucleus Radius : assumed radius (nm) of cell nucleus. Changing this value will change the relative size of each domain sphere.
default = 5000.0
E. System Parameters
In order to proceed efficiently, PGS submits both single-core and multi-thread jobs on HPC clusters (e.g. for the M-step and A-step jobs, respectively). Thus the following parameters need to be specified. - Default core : the number of cores to use for each regular job. - Default MemMB : the memory (Mb) to use for each regular job. - Max cores : the number of cores to use for each multi-thread job. - Max MemMB : the total memory (Mb) to use for each multi-thread job.
F. Command Setup
- Run mode : select a platform such as local computer, Sun Grid Engine (SGE) or Torque.
- Core limit : the maximum number of cores for PGS to use (limited to user’s quota).
- Mem limit : the limit of memory for PGS to use.
- Optional argument list : additional options for each job to run/be assigned properly on the user’s HPC, such as queue name, running time, etc. Example arguments for PBS jobs:
[‘-l’,’your_qname_here’,’-l’,’walltime=333:00:00’]. Note that the option list will be applied to each job.
G. Generate Scripts
Click the Generate button on the bottom to write a file (input_config.json) with the parameters on the working directory which has been specified by the user.
There will be a confirmation window with Yes or No button, and at this point the user can see a simple instruction in the Usage box. If Yes is clicked, then the GUI will be closed.
PGS Helper Output
PGSHelper writes configuration in input_config.json, and a shell script (runPGS.sh) under the project directory.
The following describes the contents of those 2 files.
$PROJECT_DIR/input_config.json
{   "source_dir" : "[Directory name where pgs source is]",
    "input" : {
    "raw_matrix_file " : "[raw matrix file]",
        "TAD_file" : "[ TAD file, .bed format]",
        "resolution" : "[Resolution of input contact_map_file, e.g. 100000]",
        "genome" : "[Genome version, e.g. hg19]"
    },
    "output_dir" : "[Output Directory to store the results, e.g. $PROJECT_DIR/result]",

    "modeling_parameters" : {
        "theta_list" : [Theta list e.g, "1", "0.2", "0.1","0.05","0.02","0.01"],
        "num_of_structures" : [Number of structure to generate, e.g. 1000],
        "max_iter_per_theta" : [Max Iterations per job, e.g. 10],
        "violation_cutoff" : [Violation Cutoff, e.g. 0.05]
        "chr_occupancy" : [Chromosome Occupancy, e.g. 0.2]
        "nucleus_radius" : [Nucleus Radius (nm), e.g. 5000.0]
    },
    "system" : {
        "max_core" : [Maximum number of cores in a single node],
        "max_memMB" : [Maximum size of mem(MB) in a single node],
        "default_core" : [Default number of cores],
        "default_memMB" : [Default size of mem(MB)]
    }
}
$PROJECT_DIR/runPGS.sh
python $PGS_DIRECTORY/pgs.py
    --input_config $PROJECT_DIR/input_config.json
    --run_mode [running platform]
    --nCores 300
    --memMb 800000
    --pyflow_dir $PROJECT_DIR
    --schedulerArgList  ["-q","qname","-l","walltime=100:00:00"]
RUN PGS
User can execute PGS under the project/working directory with the following command.
$ sh runPgs.sh